Sunday, March 30, 2008

Miniature Cake


smallcake, originally uploaded by bakerette.

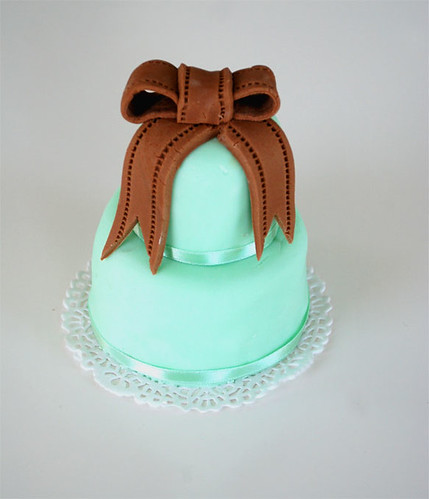
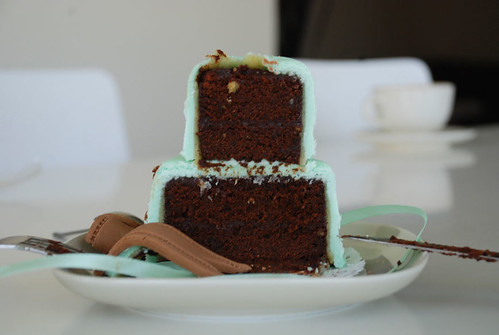
I''ve been wanting to try to make a miniature 2-tiered cake for a while for many reasons. One reason is it's quicker than the bigger version and you still get a good canvas for fun decorations without having to wait to bake and assemble the larger cakes. This small cake was made using a great recipe I found by Mich Turner in her book "Fantastic Party Cakes". It's a non-flour based cake using almond meal or "ground almonds" instead of flour and so it doesn't expand too much in the oven, is very moist without adding any syrup to it and is firm enough (like brownie texture) to cut shapes out of. I tried this recipe a few weeks ago because I wanted to make small heart shaped chocolate cakes (unfortunately I didn't take pics) I cut out the hearts and saw that alot of cake was leftover from the cutting so i just tossed in a container and put it in the fridge and knew that I could make truffles of something out of it. The batter was so tasty that it seemed a waste to throw out....next morning i woke up and it was all gone..my hubby had attacked it at night...and LOVED it. I knew it would be the perfect filling for the these miniature wedding cakes. First I cut out 2 circles of each size for each individual cake, so I had 4 circles in total, each circle is almost 1 inch thick. I filled them & crumb-coated them with chocolate ganache and then left them in the fridge till they were set. Next I rolled out some marzipan and coated each small cake with a thin layer. I left the cakes out to dry for a day. Finally I used sugarpaste with some green food-coloring to cover the marzipan after wetting it lightly with boiled water. I then placed one tier oven another and secured a light green ribbon on each. Finally I used chocolate sugar paste for th ribbon. Now I tried making chocolate MMF and ended up with a rock solid lump that nearly destroyed my stand mixer. So I used some melted chocolate and mixed it with sugarpaste and left it for 24 hours. Then kneaded it with some vegetable shortening to get it softer as it seemed too dry. It still cracked and wasn't an ideal medium but it's impossible to get chocolate sugarpaste here in Dubai.

Here is the recipe for the Chocolate Almond Cake:
100g. unsalted butter diced
flour for dusting
140g. chocolate (70% cocoa solids)
6 large eggs (separated)
140g. ground almonds
1tsp almond extract
85g. golden caster sugar (you can use regular golden sugar)

-Preheat oven to 170 degrees C
-Line a 23cm tin with non-stick baking parchment, grease and dust sides with flour
-melt unsalted butter with chocolate in a bain-marie or microwave and let cool slightly
-stir in the egg yolks, almonds, and almond extract
-whisk egg whites till soft peaks form and add sugar bit by bit, mixing very well
-stir 2 tbs of the egg whites into the chocolate mixture until combined and gently fold in the rest
-spoon into prepared tin and bake for 30-35 mins until well risen and firm.

(the cake may rise so high and then deflate-this is totally normal, it shouldn't be too thick and should be very dense and chewy).

You can serve this cake with some crème fraîche and dusted cocoa powder or using it to create miniature cakes.

4 comments:

Friday, March 28, 2008

Sugar Cookies


I just got these brand new cookie cutters in the mail and I couldn't wait to try them out. It's not easy finding decorating accessories in Dubai so I was very eager when I finally located my package at the post-office. I had to try these Bikini Cookies because I first saw them in Peggy Porschen's book and thought they were an amazing idea.. they taste amazing too. I was a bit careless with the polka dots coz I got kind of tired as I was doing a lot that day. I also think these would make great favors for a bridal shower or just a treat for a girl's night in...I can't wait to try out the rest of the cutters. I'll keep you posted :)

1 comments:

Pretty little cupcakes


I made these cupcakes with a vanilla sponge basic recipe, drenched them with sugar syrup and then dipped them in poured fondant. I topped each with 2 fondant flowers and leaves. I really enjoyed making these because the colors were very girly and I loved matching and playing around with my new fondant shaping tools. They really tasted yummy and everyone at home commented on how cute they looked!

2 comments:

Thursday, March 27, 2008

Chocolate macarons


It is rumored that chocolate macarons are the most difficult to make. But since my newfound success with both almond and pistachio macarons, I decided to be brave. I didn't have dutch processed cocoa which is cocoa used by most pastry chefs. Cocoa powder is naturally acidic and can deflate the meringue after mixing, but I braved on with the regular 100% cocoa powder I bought from Jeff de Bruges here in Dubai...and you know what? acid or alkaline, they worked out fine....These are filled with a chocolate ganache filling...

For the recipe, use the basic recipe I posted earlier and just add 25g. cocoa powder to the dry ingredients.

1 comments:

Pistachio Macarons


I think I caught the macaron bug that's been going around. I created this blog as a result of my many (mostly failed) attempts at making macarons. I found some recipes on blogs and tried them but failed...There must be some secret magical recipe or trick that I haven't tried that works!! I didn't believe other bloggers when they said that you have to find your own recipe and stick with it. I didn't believe them when they said that you shouldn't overmix and you shouldn't undermix...nothing made sense when I opened the oven and produced flat, disappointing disks of dry batter. When I first began using the French Meringue method I tried it and failed miserably. I am not sure what it was that I did but I must have been either over or undermixing my batter. So I stumbled accross Mad Baker and I thought her Macarons looked spectacular...and when I read on I discovered that she uses the Italian Meringue method. The difference between Italian and French Meringue is that French Meringue relies on simply aerating the eggs via whipping and stabilizing by adding sugar. The Italian method produces a shinier and more stable meringue. It first begins with a basic French meringue and then a sugar syrup is heated to about 120 degrees C, and you slowly pour the hot syrup into the meringue while mixing. I did try this method many many times, and I failed every single time. I was determined to keep trying this Italian method because if I am not getting anywhere with the Italian stable Meringue how could I possibly get anywhere with the French light fragile one?? I read that you shouldn't overmix, so I was very careful and mixed till the mixture was just combined and "flowed like lava" as everyone keeps saying. I ended up with baked meringues rather than macarons. Frustrated I felt that I must be doing something totally wrong so I resorted to YouTube to find a video I could watch and I found one which shows a French chef using the Italian method. I don't speak French so well but I understood enough to know that my recipe was the same as his so there must be something he did that I wasn't doing...YES....there was....he MIXED his batter and MIXED and MIXED and scraped the sides and kept MIXING....and it still "flowed like lava", I ran to the kitchen to whip up another batch and when I got to the mixing stage I did exactly what he did....I piped it out on the baking sheet, and let me tell you it looked right...I put it in the oven and waited...I sat next to the oven door and watched, but to my horror, I had worse results than ever before. That was it...why was I doing this to myself? I decided I would try this Macaron business one last time and then I was done for good! So I tried the french meringue method one last time because I couldn't bare to wash all the sticky utensils from the syrup. This time I used the recipe on Veronica's test kitchen but I was sick of overmixing so i deliberately undermixed. I used the 24-hour aged egg whites and this time when I looked in the oven and saw tiny tiny traces of feet....I was thrilled but still when I took them out they were more meringue-like and stiffer than I wanted. So I figured I should mix it th batter until "just combined". when piping, my circles appeared stiff and after a few seconds they took on the classic round shape. This time I definately saw feet. Just not as big as I wanted, but I definately think I would stick to this recipe. So the next day I tried the pistachio recipe from Veronicas sit which she links back to Tartlette and I added about a spoon of Merriwhite (egg-white powder) to the aged egg whites, I read that Pierre Herme adds it to his meringue. Anyway I thought it can't do any harm to try...and instead of using the 25grams of sugar to stabilize the meringue I increased it to about 80g. I felt that th meringue wasn't getting as shiny and as stable. Those were the only 2 things I changed. Oh and I left the piped circles out to dry till they weren't sticky anymore (about 20 mins).
And as you can see I got decent results. They tasted DIVINE too, these are sandwiched together with swiss meringue pistachio buttercream...

Things I learned for successful macarons:

  • Aging the egg whites DOES help.
  • Old almond powder yields bad results. Use blanched almonds and process them.
  • Leaving the piped circles to dry in a non-humid room DOES help.
  • Overmixing is not recommended (result=flat discs)
  • Undermixing also not recommended (result=hard shelled meringues)
  • Mixing just right is something you develop and get a feel for...forget the "lava" tip...both undermixed and overmixed batter looked like "flowing lava" to me. Always mix with a flat spatula from the outward edges of the mixing bowl towards the center in one direction only.
  • Add dry ingredients in six stages and mix each stage very briefly.
  • Immediately fill pastry bag and pipe on a parchment lined baking sheet. The mixture should maintain a stiff shape and should then spread slightly after 15 seconds or so.
  • Tap the sheet lightly on the counter before leaving to dry in non-humid room for 20 mins (I increase the AC as I live in Dubai and it can get humid)
  • Don't take them out too early or they will deflate.

So here is the Basic Recipe I used:
125g. almond powder
(I used blanched almonds and ran them in the processor + sift)
225g. icing sugar sifted
100g. aged egg whites (left outside uncovered for a day)
5 g merriwhite or egg white powder
1/4 tsp cream of tartar
70g. granulated or caster sugar


Method:
  1. whisk eggs with merriwhite and cram of tartar till white & foamy
  2. pulse icing sugar and almonds in food processor and sift
  3. keep mixing whites on high speed until the eggs aerate and increase in size and soft peaks form
  4. add granulated sugar a tablespoon at a time but drop it in slowly, mix well after each addition, keep mixing till all sugar is finished
  5. add the dry ingredients in 6 stages, mixing briefly (don't overmix)
  6. fill pastry bag with a medium plain nozzle and pipe small balls onto a baking tray lined with parchment. Try to pipe at a 90 degree angle and lift the bag upwards when finished.
  7. leave out to dry for 20 mins. You can test with your finger to see if they are dry.
  8. bake at 150 degrees. Ovens differ and my advice is to use a separate oven thermometer to check the "real" temperature. I bake them for 13 mins.
Good luck and Bon Voyage...:)

7 comments: