

This is my first official Daring Bakers challenge and I was so excited to get my hands sticky with the Cheesecake Pops hosted by Elle from Feeding My Enthusiasms & Deborah from Taste & Tell and they are adapted from the book Sticky, Chewy, Messy, Gooey by Jill O’Connor. The whole idea of making cheesecake pops seems really unique...I mean I've seen cake pops & even cupcake pops at Bakerella's blog. But cheesecake pops? Now this is a first. I wanted to make the pops unique, I really like the idea of making cheesecake balls dipped in chocolate, but I wanted more of a challenge and more room for personalization. So I dug up an old heart-shaped ice-cube mold and decided to use it to create heart-shaped pops! I started to make the actual cheesecake, which calls for a huge amount of cream-cheese. Everything seemed to work well except that it took a lot longer then 40 mins in the oven (about 77 mins). The hardest part was getting the cheese-cake into and out of the mold because it was a bit fluffy (which is why it tasted amazing), but that made it hard to get rid of any air-bubbles. I froze the mold in the freezer for a few hours and then had to carefully pop the little cheesecake hearts out without squishing them. Finally, I used a candy fork to dip the pops in white chocolate cake covering (by super cook) mixed with pink food coloring. I let it harden before I drizzled the dark chocolate on top and finally stuck the bamboo skewers into the center (couldn't find lollipop sticks here in Dubai). It was so much fun to have an idea and then see it work and so here are the making-of images and also the recipe for the pops!!
For more pops look at all the other Daring Bakers' creations, thanks to Lisa & Ivonne we have a new website and public forum set up which is great for people who need advice and help with baking and don't want to commit to baking a challenge every month!
This is the original recipe:
Cheesecake Pops
Makes 30 – 40 Pops
5 8-oz. packages cream cheese at room temperature
2 cups sugar
¼ cup all-purpose flour
¼ teaspoon salt
5 large eggs
2 egg yolks
2 teaspoons pure vanilla extract
¼ cup heavy cream
Boiling water as needed
Thirty to forty 8-inch lollipop sticks
1 pound chocolate, finely chopped – you can use all one kind or half and half of dark, milk, or white (Alternately, you can use 1 pound of flavored coatings, also known as summer coating, confectionary coating or wafer chocolate – candy supply stores carry colors, as well as the three kinds of chocolate.)
2 tablespoons vegetable shortening
(Note: White chocolate is harder to use this way, but not impossible)
Assorted decorations such as chopped nuts, colored jimmies, crushed peppermints, mini chocolate chips, sanding sugars, dragees) - Optional
Position oven rack in the middle of the oven and preheat to 325 degrees F. Set some water to boil.
In a large bowl, beat together the cream cheese, sugar, flour, and salt until smooth. If using a mixer, mix on low speed. Add the whole eggs and the egg yolks, one at a time, beating well (but still at low speed) after each addition. Beat in the vanilla and cream.
Grease a 10-inch cake pan (not a springform pan), and pour the batter into the cake pan. Place the pan in a larger roasting pan. Fill the roasting pan with the boiling water until it reaches halfway up the sides of the cake pan. Bake until the cheesecake is firm and slightly golden on top, 35 to 45 minutes.
Remove the cheesecake from the water bath and cool to room temperature. Cover the cheesecake with plastic wrap and refrigerate until very cold, at least 3 hours or up to overnight.
When the cheesecake is cold and very firm, scoop the cheesecake into 2-ounce balls and place on a parchment paper-lined baking sheet. Carefully insert a lollipop stick into each cheesecake ball. Freeze the cheesecake pops, uncovered, until very hard, at least 1 – 2 hours.
When the cheesecake pops are frozen and ready for dipping, prepare the chocolate. In the top of a double boiler, set over simmering water, or in a heatproof bowl set over a pot of simmering water, heat half the chocolate and half the shortening, stirring often, until chocolate is melted and chocolate and shortening are combined. Stir until completely smooth. Do not heat the chocolate too much or your chocolate will lose it’s shine after it has dried. Save the rest of the chocolate and shortening for later dipping, or use another type of chocolate for variety.
Alternately, you can microwave the same amount of chocolate coating pieces on high at 30 second intervals, stirring until smooth.
Quickly dip a frozen cheesecake pop in the melted chocolate, swirling quickly to coat it completely. Shake off any excess into the melted chocolate. If you like, you can now roll the pops quickly in optional decorations. You can also drizzle them with a contrasting color of melted chocolate (dark chocolate drizzled over milk chocolate or white chocolate over dark chocolate, etc.) Place the pop on a clean parchment paper-lined baking sheet to set. Repeat with remaining pops, melting more chocolate and shortening (or confectionary chocolate pieces) as needed.
Refrigerate the pops for up to 24 hours, until ready to serve.
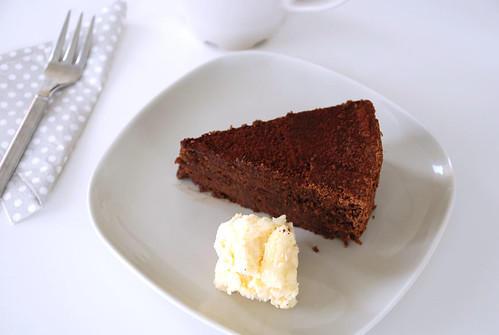
I had so much left-over cheesecake after making the pops that I made mini-cheesecakes with crushed digestive biscuits and decorated them with the remaining chocolate & strawberries...
This cheesecake is so versatile and tastes so great, I definately think I will make it again. A couple of night after making the pops (of course they were all gone), a friend came over and I had some left-over cheesecake sitting in the fridge. I crushed some digestive biscuits in a bowl, scooped out some cheesecake on top and drizzled it with chocolate sauce...it was heavenly!
Saturday, April 26, 2008
I Love Cheesecake Pops...
Wednesday, April 23, 2008
You say Clementine, I say Minneola!

It's an orange, it's a tangerine...no, It's a Minneola!!
Well they're not the same thing but they're definately related. Minneola is Clementine's big brother. He's got thicker skin, a darker color and a big big nose. This is the easiest way to identify a Minneola, is the nose, a very distinctive characteristic. A Minneola is really a cross between a tangerine and a grapefruit...I remember it as a child because my grandma's neighbour, who is a very close and dear person to our hearts, always made Minneola Preserve, which is very similar to Marmalade. So where do clementines fit in? Well I made Nigella Lawson's Clemetine cake many times and it's always been a big hit. So frankly I saw some great looking minneola's at the market and thought they may work just as well, and they did...actually they worked better. I first saw this recipe on TV and had to try it...the reason was that Nigella used the whole fruit rather than the zest or juice, which I thought must make the flavor very distinctive. Most cakes taste best right out of the oven but this is one cake you want to bake in the evening and let it sit, un-moulded, on your counter till the next morning. While you tea and coffee are brewing this cake will be there waiting for you, and will definately awaken your taste-buds. The reason why you need to wait is because the almonds and the clementine mixture make this cake so soft that it almost feels like it's been drenched in syrup, but if you have it fresh out of the oven it tends to taste a bit too mushy. I did this very thing yesterday night (baked it and left it alone, went to sleep) and this picture was taken at 7am, you can see the morning light seeping through the window, the browned exterior gave way to the golden bright yellow interior and at that moment it resembled a large slab of gold. I couldn't resist trying a couple of slices before heading to work and it was heavenly, true edible gold.

So to the recipe:
6 eggs
225g sugar (i use caster)
250g ground almonds
1 tsp baking powder
- Prepare two pans, I used a 20 cm spring-form pan and a 25cm loaf pan. Make sure you butter and line them (sides too) with parchment or else the cake will stick.
- Preheat oven to 190ºC.
- Boil clementines (or other citrus fruit) for 2 hours non-stop.
Drain & cool. Cut in half and remove pips. - Blitz whole fruit in the food processor until completely liquidized (you can add a tiny bit of the liquid to facilitate).
- Mix dry ingredients and add to the fruit, mix very well. Add one egg at a time mixing well after each addition. Mixture will resemble a thick liquid.
- Pour into prepared pans and bake at 190ºC for 1 hour. (if your oven tends to brown cakes quickly then cover cake after 40 mins).
- Take out of the oven and place on a cooling rack for at least an hour (better left overnight). Carefully run a knife around the edges and un-mould (for the spring-form pan) or lift out the cake using the parchment paper (for the loaf pan).
Sunday, April 20, 2008
The gooiest chewiest brownies!

It wouldn't be a normal occurrence for me to follow the chocolate almond cake -which is really chewy and soft in its own right- with a gooey chewy chocolate brownie recipe...however, my husband wanted gooier!!! And so I said you must be craving brownies...he just gave me a puzzled look. My husband doesn't care about names....cake brownie, biscuit, macaron....who cares what you call it as long as it tastes yummy. A close girl-friend came over the next day for some girl talk and also needed a chocolaty accompaniment!! Nothing can possibly be a more perfect companion to gossip than a gooey chewy brownie topped with a nice scoop of vanilla ice-cream and drizzled with chocolate sauce. So I asked her to bring the tub of ice-cream and while my husband got dressed to go see his mum and dad I baked the chewiest gooiest brownie ever. Adapted from the Martha Stewart Baking book...if you like a cakey brownie this is definately not your cup of tea...but if you like "fzzt fzzt" ( that's the squishy sound my husband made when describing the texture he was after in a chocolate dessert), then this will definately indulge your senses...

Ingredients:
8 ounces bittersweet chocolate
1 stick of butter (about 110 grams)
11/2 cups of sugar
1tsp vanilla
4 large eggs
3/4 cup of all-purpose flour
1/4 tsp salt
Line a buttered 8 x 8 inch baking pan or pyrex pan with parchment paper and preheat oven to 175 ℃.
Melt chocolate and butter in a water bath. When fully melted, let sit to cool. Mix in the sugar and vanilla and eggs one at a time. Gently fold in flour and salt, mix well and pour into prepared pan. Place in oven and bake for 45-55 mins until the top is a lighter brown color and when a cake tester is inserted it comes out with a few crumbs.
Lift out the baked brownies from the pan onto a cooling rack and when completely cool chop into squares. The top may crumble and crack but the insides will be soft and chewy!!
Saturday, April 19, 2008
Chocolate Almond Cake

My in-laws were coming to visit us from Alexandria. My Father in law is a football enthusiast and so that particular day there was a very important match on TV. I decided to bake a rich chocolaty cake to drain some of the tension that the match would inevitably cause. I resorted to my tried and tested flourless chocolate cake. This recipe uses no flour or butter and instead uses ground almonds (almond meal or almond flour). My husband loves this cake and I love that he loves it because it is somewhat healthier than other chocolate cakes. It's amazing how chewy, gooey and soft this cake is. It's very versatile and I featured it before on the blog as a base for the Miniature Cake. However the cake is perfect on it's own, this time I simply filled it with some leftover chocolate ganache I had in the fridge and dusted it with cocoa powder. It's great served with vanilla ice-cream, fresh cream or even ......cheese-cake, well not really cheesecake, just the creamy, cheesy upper layer of cheesecake, I was using it for a recipe that I will post soon and I had a lot left over and I found it to be a great accompaniment to this chocolaty cake.
Strawberry Jam & Strawberry Birthday Cake
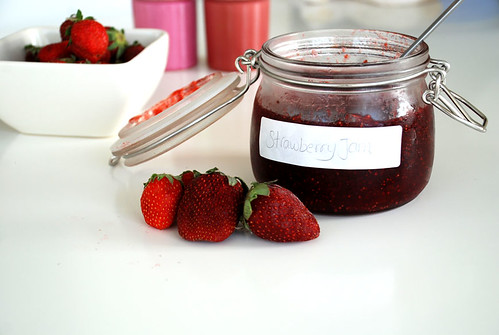
Strawberry Jam, originally uploaded by bakerette.
I was shopping at the supermarket and found some local strawberries that looked yummy and were quite cheap. I decided to buy 6 small boxes and make strawberry jam. My husband loved strawberry jam and we usually buy "bon maman" because it tastes so natural and is more of a preserve than a jam. I used about 3 pounds of strawberries, 4 cups of sugar, a couple of squeezes of lemon juice and a splash of balsamic vinegar. The vinegar is a Nigella Lawson tip which she claims makes the strawberries strawberrier if that is a possibility. I loved the jam and it was strawberrily delicious...not sure if the balsamic contributes but I'll use it from now on anyway!
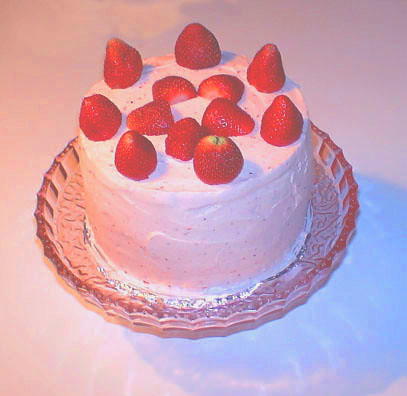
So this brings us to the next half of the title, the Birthday Cake. It was Husband's b-day on the 12th of April, and since he loves strawberries and strawberry jam, I made him??? Yep Strawberry cake. I used the Dorie Greenspan recipe "Perfect Party Cake" from the last Daring Bakers Challenge. I liked the cake a lot and, so I filled the layers with the homemade strawberry jam and a strawberry swiss meringue butter-cream and decorated it with fresh strawberries. Of course I don't always have the time to take good pics for my blog so since I was busy making all the other birthday goodies that day , all I have is a washed out pic taken with my other, less advanced camera...
Monday, April 7, 2008
Raspberry Meringue Pie

I made this pie when a close friend came over yesterday. I know that meringue is traditionally used with a lemon pie but honestly I didn't have lemons on hand so I decided to make homemade raspberry jam and use it as the pie filling. The pie crust is Pate Brisé and and it's topped with swiss meringue. The raspberries were juicy and sweet and the crust very crumbly and the meringue just added another layer of flavor and texture.
Recipe will follow soon :)
As promised here is the recipe:
For the crust:
(Pâte Brisée)
2.5 cups all-purpose flour
1 tsp salt
2 sticks of butter (226 grams)
1/4 cup ice cold water
In the bowl of a food processor, combine salt and flour, add butter until mixture resembles coarse crumbs, with the machine still running add the water through the feed tube , in a slow steady stream. The dough should not be wet sticky. Do not process for more than 30 seconds. Turn out dough onto a clean surface and divide in half, wrap each piece in clingfilm and pat into a disk. Refrigerate for at least 1 hour or overnight. Dough can be frozen up to one month.
Roll out to 1/4 inch thick and press into tart mould. Refrigerate for 30 mins. To blind bake, place round piece of parchment larger than the dish and fill with dried beans. Bake for 15-20 mins at 375℉ or 180℃.
For the raspberry jam:
3 cups fresh or frozen raspberries,
1.5 tbs. lemon iuce
3/4 cups of sugar
1 tbs cornstarch
1/4 tsp salt
mix all together and simmer for 10 mins till the mixture thickens.
For the Swiss Meringue:
4 large egg whites
3/4 cups of sugar
pinch of salt
In a heatproof bowl of an electric mixer combine ingredients and place over a saucepan of simmering water (water should not touch bowl) whisk till mixture is whitish and frothy and very warm to touch. sugar should be dissolved. Move the bowl to the stand mixture and whisk till mixture form soft but not dry peaks. Pipe meringue as desired and either use a torch to brown the meringue or place under broiler or light grill.
Friday, April 4, 2008
Perfect Party Cake
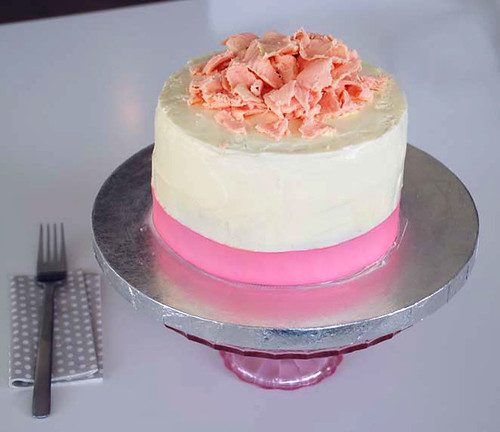
I just joined the Daring Bakers and even though I am officially not required to bake the March challenge since I joined in April, I was so excited to get started that I decided to bake the March Challenge anyway!
My daughter's Nanny's birthday was yesterday and so I thought it would be a good excuse to bake this cake...It's a recipe from Dorie Greenspan's book: Baking From My Home To Yours. The recipe is versatile enough that it can be filled and topped with almost anything. I made it using two 6 inch pans and then filled the cakes with strawberry preserve and swiss meringue buttercream. Covered the whole thing in swiss meringue buttercream and then topped it with pink tinted white chocolate shavings. (I got the idea to use chocolate for the topping from Tartlette, I really loved the idea of mixing white chocolate with pink coloring to obtain this very pretty topping. The original recipe calls for coconut and I hate coconut...)
We also don't have buttermilk here in Dubai so I substituted it with whole-milk and 1 tsp of vinegar.
Here is the original recipe:
Words from Dorie:
Stick a bright-coloured Post-it to this page, so you’ll always know where to turn for a just-right cake for any celebration. The original recipe was given to me by my great dear friend Nick Malgieri, of baking fame, and since getting it, I’ve found endless opportunities to make it – you will too. The cake is snow white, with an elegant tight crumb and an easygoing nature: it always bakes up perfectly; it is delicate on the tongue but sturdy in the kitchen – no fussing when it comes to slicing the layers in half or cutting tall, beautiful wedges for serving; and, it tastes just as you’d want a party cake to taste – special. The base recipe is for a cake flavoured with lemon, layered with a little raspberry jam and filled and frosted with a classic (and so simple) pure white lemony hot-meringue buttercream but, because the elements are so fundamental, they lend themselves to variation (see Playing Around), making the cake not just perfect, but also versatile.
For the Cake
2 ¼ cups cake flour
1 tablespoon baking powder
½ teaspoon salt
1 ¼ cups whole milk or buttermilk (I prefer buttermilk with the lemon)
4 large egg whites
1 ½ cups sugar
2 teaspoons grated lemon zest
1 stick (8 tablespoons or 4 ounces) unsalted butter, at room temperature
½ teaspoon pure lemon extract
For the Buttercream
1 cup sugar
4 large egg whites
3 sticks (12 ounces) unsalted butter, at room temperature
¼ cup fresh lemon juice (from 2 large lemons)
1 teaspoon pure vanilla extract
For Finishing
2/3 cup seedless raspberry preserves stirred vigorously or warmed gently until spreadable
About 1 ½ cups sweetened shredded coconut
Getting Ready
Centre a rack in the oven and preheat the oven to 350 degrees F. Butter two 9 x 2 inch round cake pans and line the bottom of each pan with a round of buttered parchment or wax paper. Put the pans on a baking sheet.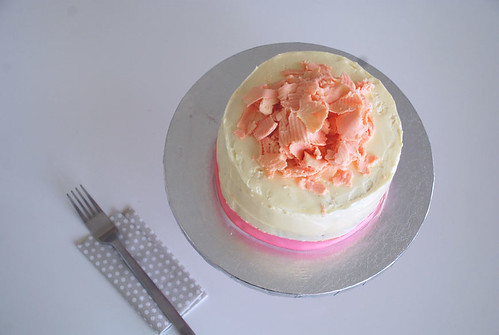
To Make the Cake
Sift together the flour, baking powder and salt.
Whisk together the milk and egg whites in a medium bowl.
Whisk together the sugar and lemon zest in a mixer bowl or another large bowl and rub them together with your fingers until the sugar is moist and fragrant.
Add the butter and working with the paddle or whisk attachment, or with a hand mixer, beat at medium speed for a full 3 minutes, until the butter and sugar are very light.
Beat in the extract, then add one third of the flour mixture, still beating on medium speed.
Beat in half of the milk-egg mixture, then beat in half of the remaining dry ingredients until incorporated.
Add the rest of the milk and eggs beating until the batter is homogeneous, then add the last of the dry ingredients.
Finally, give the batter a good 2- minute beating to ensure that it is thoroughly mixed and well aerated.
Divide the batter between the two pans and smooth the tops with a rubber spatula.
Bake for 30-35 minutes, or until the cakes are well risen and springy to the touch – a thin knife inserted into the centers should come out clean
Transfer the cakes to cooling racks and cool for about 5 minutes, then run a knife around the sides of the cakes, unfold them and peel off the paper liners.
Invert and cool to room temperature, right side up (the cooled cake layers can be wrapped airtight and stored at room temperature overnight or frozen for up to two months).
To Make the Buttercream
Put the sugar and egg whites in a mixer bowl or another large heatproof bowl, fit the bowl over a plan of simmering water and whisk constantly, keeping the mixture over the heat, until it feels hot to the touch, about 3 minutes.
The sugar should be dissolved, and the mixture will look like shiny marshmallow cream.
Remove the bowl from the heat.
Working with the whisk attachment or with a hand mixer, beat the meringue on medium speed until it is cool, about 5 minutes.
Switch to the paddle attachment if you have one, and add the butter a stick at a time, beating until smooth.
Once all the butter is in, beat in the buttercream on medium-high speed until it is thick and very smooth, 6-10 minutes.
During this time the buttercream may curdle or separate – just keep beating and it will come together again.
On medium speed, gradually beat in more lemon juice, waiting until each addition is absorbed before adding more, and then the vanilla.
You should have a shiny smooth, velvety, pristine white buttercream. Press a piece of plastic against the surface of the buttercream and set aside briefly.
To Assemble the Cake
Using a sharp serrated knife and a gentle sawing motion, slice each layer horizontally in half.
Put one layer cut side up on a cardboard cake round or a cake plate protected by strips of wax or parchment paper.
Spread it with one third of the preserves.
Cover the jam evenly with about one quarter of the buttercream.
Top with another layer, spread with preserves and buttercream and then do the same with a third layer (you’ll have used all the jam and have buttercream leftover).
Place the last layer cut side down on top of the cake and use the remaining buttercream to frost the sides and top.
Press the coconut into the frosting, patting it gently all over the sides and top.
Serving
The cake is ready to serve as soon as it is assembled, but I think it’s best to let it sit and set for a couple of hours in a cool room – not the refrigerator. Whether you wait or slice and enjoy it immediately, the cake should be served at room temperature; it loses all its subtlety when it’s cold. Depending on your audience you can serve the cake with just about anything from milk to sweet or bubbly wine.
Storing
The cake is best the day it is made, but you can refrigerate it, well covered, for up to two days. Bring it to room temperature before serving. If you want to freeze the cake, slide it into the freezer to set, then wrap it really well – it will keep for up to 2 months in the freezer; defrost it, still wrapped overnight in the refrigerator.
Playing Around
Since lemon is such a friendly flavour, feel free to make changes in the preserves: other red preserves – cherry or strawberry – look especially nice, but you can even use plum or blueberry jam.
Fresh Berry Party Cake
If you will be serving the cake the day it is made, cover each layer of buttercream with fresh berries – use whole raspberries, sliced or halved strawberries or whole blackberries, and match the preserves to the fruit. You can replace the coconut on top of the cake with a crown of berries, or use both coconut and berries. You can also replace the buttercream between the layers with fairly firmly whipped sweetened cream and then either frost the cake with buttercream (the contrast between the lighter whipped cream and the firmer buttercream is nice) or finish it with more whipped cream. If you use whipped cream, you’ll have to store the cake the in the refrigerator – let it sit for about 20 minutes at room temperature before serving.


43 comments:
Post a Comment