

I think I would call myself a picky eater, there are things I won't eat...and refuse to even try. My first taste of crab -when I was 10 years old-was forced down my mouth by my much older brother. My first taste of Egyptian stuffed sausage was again forced and me, flailing arms and disgusted faced, soon would relax to find that I actually liked what I refused to try. But I still have my food hang-ups! With desserts however, I have no hang-ups whatsoever! I'm not a big fan of chili in savory dishes but when I saw this recipe in a woman's weekly magazine I was drawn to it. The combination of chocolate and spices or flavors- usually not used in sweets- thrilled me. I was once watching a show about the chocolatier Vosges and wanted to jump into the screen and try out the flavors. The pairing of chocolate & spices is so interesting and definately adds another dimension to sweets. The nice thing about these cookies is that the chilli flavor is very subtle but when you taste it, just kicks you a bit...it's almost like your tongue reacts all over. If you didn't know there were chillis in it, you may not ever guess what it is that gives you that sensation. It's definately a departure from the regular double chocolate chip cookie. Even if you hate spicy food these are worth trying...my husband won't even eat too much pepper in his food but he gobbled half of these up.
recipe:
250g butter
1 tsp vanilla extract
3/4 cup (165 g) caster sugar
3/4 cup (165 g) firmly packed brown sugar
1 egg
2 cups (300g) plain flour
1/4 cup (25g) cocoa powder (I used dutch-processed)
1 tsp bicarbonate of soda (baking soda)
400 g dark semi-sweet chocolate chopped (or choc. chips)
candied chillies
1/4 cup (55g) caster sugar
1/ cup (60 ml) water
3 fresh thai chillies chopped finely
Preheat oven to 180℃. Grease baking trays & line with parchment paper.
Make the candied chillies.
Beat butter, extract, sugars and egg in a stand mixer or hand-held mixer till light and fluffy, transfer to large bowl. Stir in sifted flour, cocoa and soda in 2 batches. Stir in chilli & chocolate. Scoop out balls of the mixture using an ice-cream scooper and place 5cm apart on the baking trays. Bake 12 minutes. Cool wire racks.
candied chillies method:
Stir sugar and water in a small saucepan over heat until sugar dissolves. Add chilli and boil for 2 mins. Cool, strain and discard syrup.
The cookies are best when they are eaten the same or next day. So you can wrap up the remaining dough in double sheets of parchment and store in the freezer for a rainy day!
Saturday, May 24, 2008
Double Choc-Chip Chilli Cookies
Tuesday, May 13, 2008
Hokey-Pokey!

I was first introduced to this curious sweet in England in the 1980's. That's when I had my first crunchie bar ever, it came in this shiny bright orange wrapper. My brothers and I loved it, and fought over it whenever we had one to share... it was all about the golden, crisp, sweet and air-filled center. I remember wondering how they got it in there and what it was made from. It tasted so wonderful and the texture was so enticing that it made you want to take another bite, and another, and pretty soon the mysterious chocolate bar was gone. If I had known then as a 5 year old, what I know now...that the golden crisp centre was made using very simple ingredients and that it can be easily cooked up using a saucepan and some heat I would have gone nuts. But then again the mystery of the crunchie would have been dissolved and I would be left with an obvious "it's just sugar, duh"!! I think I still would've eaten tons of it because I made this yesterday and it's all gone today and I'm 30 not 5!!!
The sweet originated in New Zealand and seems to be a popular favorite there. I don't know how it got it's name (which usually refers to a dance that kids do) but apparently early ice-cream wrapped in wax paper was called hokey-pokey. I saw Nigella Lawson make this on TV a while back. What I like about Nigella is that she reminds me of myself...she's passionate about what she cooks. She eats with such fervor and passion and almost devours food in a way that can't be fake. She made a batch of hokey-pokey for a friend and she ate it all in the taxi on the way there... this what I would do...When I saw her make it my mind was racing with all the possibilities I could use this for...mix it with vanilla ice cream, add it to cheesecake...and make it into shapes, so that how I thought of pouring it into a mold.
Anyway I adjusted the recipe a bit and instead of just pouring it on parchment or a silpat I used a silicone mold. The mold allows sugar to set thicker and so you get more of the amazing texture that the hokey-pokey is all about (and that's what it's all about he he)!!
Basic Hokey-Pokey:
(can be stored in an airtight container for a few days)
200g caster sugar
3 tbs golden syrup
1 tsp baking soda
In a medium saucepan add the sugar and syrup and stir once or twice on low heat. Turn the heat to medium and once everything dissolves turn it back to low. Don't stir too much, just let everything melt together and once it starts bubbling stir a few more times. It should be golden and completely dissolved. Don't leave it on the heat too much or it will burn and taste awful. Take the saucepan off the heat and working quickly add the baking soda stirring once or twice. Once it starts expanding and bubbling up pour it into the molds, parchment or on a silpat (note: the mixture will be bubbling like an erupting volcano so it won't pour perfectly, you have to sort of pour it and then spread it a bit). The mixture will be VERY hot so resist touching it. Leave it alone for 20 mins. or so. Break it up & eat..
Hokey-Pokey with Peanut Butter & Chocolate:
Leave the hokey-pokey to cool down in the mold. The middle should sink in a bit giving you a sort of cavity that you can fill with peanut butter (I used crunchy for added texture). Melt some chocolate melts, cake covering or even milk chocolate and pour over the peanut butter and level it with the tops of the molds.
Allow to cool at room temp or in the fridge very briefly. Carefully un-mold the cups breaking the edges away (make sure you don't have any sharp edges). Take a bite and enjoy.
Alternatively if you have no molds you can just dip hokey-pokey pieces in chocolate and let them cool then spread some peanut butter on top...heavenly!
Thursday, May 8, 2008
Rich Chocolate & Orange Mousse and a Thank You!
,
I think what is great about keeping a blog is that it provides structure to our otherwise cluttered life. Everyday when I go to sleep I always make a mental list of the things I need to do the next day, make my sons weekly purees, or clean out my closet, get an assignment ready for a class. I sometimes even think about what I'll cook or wear or buy. It's so overwhelming and when I wake up the next day I set about to fulfill the tasks I rehearsed in my head. Sometimes I complete them and other times I don't and a hint of frustration sets in. But when I've written a post, or baked something, it keeps me satisfied. It gives a sense of completion and there is evidence of productivity and I think that's really all that matters. I've been unsure whether or not to keep blogging since I'm new and not sure if my blog "means much" but as someone helped me realize that I'm not doing it for people, but doing it for myself and it can be therapeutic and give so much satisfaction.
I've read in some blogs (the links to are at the bottom of this post) about giving back and the self-indulgence involved with creating and the guilt that comes with it. Creating is an act of giving in itself, it doesn't matter if what you're creating is a painting, a cookie or a movie. I don't think blogging is a Pygmalion-like activity, at least not for most. It’s not like you’re admiring your creation, boasting about it or even out to satisfy a selfish streak (well maybe a tiny bit and we’re all entitled to it). I think the bigger picture is about sharing. Sharing what you’ve created, sharing the memories & excitement of how you made it and the stories that come with it. Giving it a place in more than one person’s consciousness. Since sharing is an act of giving then it cannot be a self- indulgent act.
So what would happen if suddenly the blog-o-sphere collapsed. And there were no more blogs, beautiful pictures or comments. Could we survive? The answer is an easy yes. Even though our blogs provide structure, satisfaction and allow us to share, even a small part of ourselves with others. Losing them does not matter. Just like if lose your home, it hurts…but when the shock wears away, what you miss most are your old photos and letters maybe…but when you have people you care about around you, then you count your blessings and move on. Even when we lose a person close to us. Now that really does hurt. But it is the end? No, because we have our memories. Because we’ve shared so much with that person and those acts of sharing and giving will always remain with us no matter how far apart we are.
Part of why I love reading blogs and writing in one is because you can read/write about anything from the mundane trivial everyday matters to the more complex, profound, serious or even universal issues. Precisely what life is about. You may have a tragedy happen to you one day and a day or two later you're laughing at a silly joke or doing your laundry. it doesn't mean the pain has gone or has been trivialized. It only means we our keeping our sanity. Just like what I read in Tartlelette's blog yesterday, peeling tangerines may keep your mind of your pain for a few seconds...those few second may be enough to keep you sane. And everyone needs a creative outlet, something they can plant, water and watch grow, something that gives back. Yes, tragedies may happen anywhere in the world or anytime in your life, but just because you keep a blog or make a painting or even sing in the shower doesn't mean you are taking life any less seriously.
Even though I am trained as an Artist I always come back to food and desserts specifically, I find myself staring at the colors and shapes of desserts at any shop with the wonder of a 5 year old, and the admiration of an art-critic looking at a pollock. I find myself smiling when I think about the infinite possibilities I can whip up in my kitchen. Your whole being is involved when you're making something sweet. You senses, your hands, your brain and like someone told me recently, your heart. It is the immediate gratification you get when you see your finished creation and the suspense that builds up to it and the suspense and satisfaction involved in tasting it. Like when you're developing your own photos and wait for the developer to work on your image and it finally appears its like magic. Almost like opening a brand new brightly wrapped present, part of the whole thrill is not knowing what's inside. All of these activities bring out the child in us. Every day when I check all my Google page, with feeds from all the blogs I love, and I see a new title, I get so excited. I click and wait, the page goes blank to reveal a new treat, and an equally thrilling anecdote and in my mind it creates a beautiful memory.
Before I get to the recipe I wanted to write a thank you to two people I don't know very well but showed me that blogging can be a support network and motivated me to keep creating & sharing. So thanks Aran & Helene, your blogs are truly inspirational!
I created this recipe for Sugar High Friday's created by Jennifer of The Domestic Goddess & hosted by Tartelette. This month's flavor is citrus... and when I first read it I thought I would make a citrus cake like the Clementine or Minneola Cake that I made so many times before and is a friends & family favorite. But I wanted to make something different this time. Terry's chocolate orange is one of my favorite chocolates and this rich mousse reminds of it in a refined way. I love chocolate in combination with fruits and the rough texture of the sweet, citrusy zest of the orange compliments the rich, smooth chocolate perfectly.
Rich Chocolate & Orange Mousse
(by Michel Roux)
150g plain chocolate (55%-70% cocoa solids) chopped.
1 tbsp liquid glucose
2 egg yolks
150ml double cream
30g Icing sugar
to decorate:
1 orange washed
100g. caster sugar
Prepare the decoration: Finely pare the zest from the orange into fine strips using a zester. place in a saucepan & cover with cold water, bring to a boil, over medium heat. Refresh and drain & repeat twice more. Put zests in small pan with 100ml of water and the caster sugar. Bring to a boil & buble for 1 minute. Leave the zests in the syrup. When cold drain & set aside.
To make the mousse, place chocolate in a double boiler. Bring water to a simmer. When the chocolate has melted take the bowl off the heat. Mix the glucose with the yolks and 2 tbsps of hot water, then mix into the melted chocolate.
In another bowl whip the cream & icing sugar to a ribbon consistency, then delicately fold it into the mousse without overworking. Pour 1/3 of the mousse in 4 glasses or glass bowls, scatter 1/3 of the zests on top repeat the layers twice finishing with a layer of mousse sprinkled with orange zest, refrigerate for one hour before serving. If refrigerated for longer then remove 30 mins before serving.

Friday, May 2, 2008
Please sir, can I have s'more?
I'm not a pastry chef, I'm an amateur baker who loves desserts. There's a very big difference between your grandmas homemade apple pie and a French tart you eat at a nice Parisian restaurant. They may be at either ends of the spectrum. Pastry chefs tend to use refined & special ingredients and the tastes can be complex yet subtle. Your grandma makes simple treats that she creates using seasonal fruits or homemade jams. Nothing has to look perfect because it's going to be eaten up anyway and the taste is always very ...home-made, comforting and nostalgic. This pie is the embodiment of those words...it's a pie that a pastry chef would turn his nose up on, but it's a pie that gives you this warm fuzzy feeling inside. I don't mind eating & making either desserts...because I don't follow a particular direction in my baking. Anything that looks good to me will end up on this blog, whether it's a French Macaron, Austrian strudal, Belgian waffle, Egyptian Baklawa or even American Pie :)
So, inspired by a love for s'mores, I decided to make a s'mores pie. I normally have something sweet that I've baked lying around the kitchen, but if I don't, I simply make the 5 second treat known as the "s'more". My daughter loves Barney (a big purple dinosaur I secretly hate but pretend to love) but basically in Barney's words this is how you make a s'more:
"You take a graham cracker and you break it in two
You melt a chunk o' chocolate and get it just right
You melt a marshmallow and you get it real hot
you smush 'em all together and you take a big bite
mmmm smores you know it's alright!" (or something along those lines...haha)
We don't always find Graham Crackers here in Dubai. And if you find them they'll probably cost triple of what "digestives" cost. Digestives are the British version of Grahams. Some argue they don't even come close but ever since I was a child my mother used digestives for cheesecake since we lived in England for almost 5 years. It is only when I traveled to the US for graduate school that I discovered the Graham, and honestly I do prefer it to the digestive, I don't know why exactly, maybe it's the crunch, not sure...my daughter (she's about 20 months) prefers the digestive still.
Basically, the pie is a graham cracker crust that I made from scratch (I happened to find graham flour), the middle is a rich chocolate custard and it's all topped with a yummy gooey layer of mini-marshmallows.
So here is the recipe:
Graham crackers/pie crust:
1 1/2 cups all-purpose flour
1 1/2 cups graham flour
1 tsp baking soda
1 tsp ground cinnamon
1/2 tsp salt
2 sticks or 1 cup of butter
3/4 cup packed light brown sugar
2 tbs. honey
Preheat oven to 350ºF degrees.
Mix both flours, baking soda, cinnamon, and salt in a medium bowl. In a stand mixer fitted with the paddle attachment beat sugar, honey and butter till fluffy and light. Add flour mixture slowly and when combined transfer to a floured surface and shape into crackers or if making pie crust line the pie tin. Refrigerate for 20 mins and bake if making cookies. If making pie line the crust with parchment paper and add pie weights or dried beans and bake for 20 mins. Remove beans and bake for 10 more mins.
The chocolate custard pie filling:
6 tbs cornsarch
1/2 sugar
1/4 cup dutch-processed cocoa powder
3 cups whole milk
4 large egg yolks
1/4 tsp salt
Lightly whisk egg yolks and set aside. In a medium saucepan whisk the milk, sugar, cornstarch, cocoa & salt, bringing the mixture to a simmer not boil. Slowly had a quarter of the milk mixture to the egg yolks mixing well. whisk in the remaining mixture and at this stage add the chopped semi-sweet chocolate and whisk until melted. Return to the saucepan and cook, whisking constantly for 3-4 mins. Do not boil but allow mixture to thicken. Rerigerate and cover with plastic wrap till needed.
To assemble the pie:
Pour custard into the baked pie shell and refrigerate for at least 2 hours or overnight. When chilled add mini marshmallows and using a kitchen torch scorch the marshmallows till they melt slightly and turn golden in places.

Sunday, April 20, 2008
The gooiest chewiest brownies!

It wouldn't be a normal occurrence for me to follow the chocolate almond cake -which is really chewy and soft in its own right- with a gooey chewy chocolate brownie recipe...however, my husband wanted gooier!!! And so I said you must be craving brownies...he just gave me a puzzled look. My husband doesn't care about names....cake brownie, biscuit, macaron....who cares what you call it as long as it tastes yummy. A close girl-friend came over the next day for some girl talk and also needed a chocolaty accompaniment!! Nothing can possibly be a more perfect companion to gossip than a gooey chewy brownie topped with a nice scoop of vanilla ice-cream and drizzled with chocolate sauce. So I asked her to bring the tub of ice-cream and while my husband got dressed to go see his mum and dad I baked the chewiest gooiest brownie ever. Adapted from the Martha Stewart Baking book...if you like a cakey brownie this is definately not your cup of tea...but if you like "fzzt fzzt" ( that's the squishy sound my husband made when describing the texture he was after in a chocolate dessert), then this will definately indulge your senses...

Ingredients:
8 ounces bittersweet chocolate
1 stick of butter (about 110 grams)
11/2 cups of sugar
1tsp vanilla
4 large eggs
3/4 cup of all-purpose flour
1/4 tsp salt
Line a buttered 8 x 8 inch baking pan or pyrex pan with parchment paper and preheat oven to 175 ℃.
Melt chocolate and butter in a water bath. When fully melted, let sit to cool. Mix in the sugar and vanilla and eggs one at a time. Gently fold in flour and salt, mix well and pour into prepared pan. Place in oven and bake for 45-55 mins until the top is a lighter brown color and when a cake tester is inserted it comes out with a few crumbs.
Lift out the baked brownies from the pan onto a cooling rack and when completely cool chop into squares. The top may crumble and crack but the insides will be soft and chewy!!
Saturday, April 19, 2008
Chocolate Almond Cake

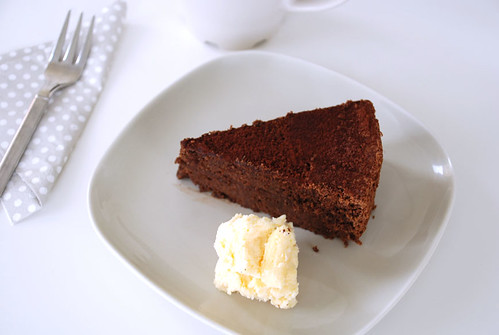
My in-laws were coming to visit us from Alexandria. My Father in law is a football enthusiast and so that particular day there was a very important match on TV. I decided to bake a rich chocolaty cake to drain some of the tension that the match would inevitably cause. I resorted to my tried and tested flourless chocolate cake. This recipe uses no flour or butter and instead uses ground almonds (almond meal or almond flour). My husband loves this cake and I love that he loves it because it is somewhat healthier than other chocolate cakes. It's amazing how chewy, gooey and soft this cake is. It's very versatile and I featured it before on the blog as a base for the Miniature Cake. However the cake is perfect on it's own, this time I simply filled it with some leftover chocolate ganache I had in the fridge and dusted it with cocoa powder. It's great served with vanilla ice-cream, fresh cream or even ......cheese-cake, well not really cheesecake, just the creamy, cheesy upper layer of cheesecake, I was using it for a recipe that I will post soon and I had a lot left over and I found it to be a great accompaniment to this chocolaty cake.
Thursday, March 27, 2008
Chocolate macarons

It is rumored that chocolate macarons are the most difficult to make. But since my newfound success with both almond and pistachio macarons, I decided to be brave. I didn't have dutch processed cocoa which is cocoa used by most pastry chefs. Cocoa powder is naturally acidic and can deflate the meringue after mixing, but I braved on with the regular 100% cocoa powder I bought from Jeff de Bruges here in Dubai...and you know what? acid or alkaline, they worked out fine....These are filled with a chocolate ganache filling...
For the recipe, use the basic recipe I posted earlier and just add 25g. cocoa powder to the dry ingredients.


14 comments:
Post a Comment